

Getting started
Get started with Lightspeed
This walkthrough takes you from an installation to a model response in a persistent session. On Linux, start with a prebuilt release. You only need Rust and a source checkout if you choose the development launcher.
Before you start
You need an OpenAI or Anthropic API key with access to a suitable model, and an account with permission to manage integrations and sessions: a universe owner or admin, or a platform administrator.
If someone has already deployed Lightspeed for you, open that installation with your assigned account and continue at Sign in and create a universe.
Install a prebuilt release on Linux
GitHub Releases provides Linux x86_64 binaries and a release manifest identifying the matching container images. You can install these without Rust, Cargo, or a source checkout.
For the complete product, including the web app used in this walkthrough, follow Self-host Lightspeed. That guide pulls the published runtime and Platform images, connects them to PostgreSQL and Temporal, and sets up your administrator account and public URL. It assumes you provide those services and an HTTPS reverse proxy.
You can also download the standalone binaries
directly from the release assets. The server archive contains
lightspeed-server; the CLI archive contains lightspeed. The server still
needs PostgreSQL and Temporal, and the web app runs in the separate Platform
application. Downloading the server alone does not start the complete product.
Once your installation is running, continue at Sign in and create a universe.
Run from source for local development
The development launcher starts the web app, runtime, databases, storage, and Temporal together. Use this path to work on Lightspeed itself, or to try the complete local stack on macOS or Linux with the build tools installed.
You need:
- A Lightspeed source checkout, with a terminal open at its root.
- Rust and Cargo through rustup. The repository’s
rust-toolchain.tomlselects the required compiler version. - Node.js 24 or newer, including npm.
- Docker running, with Docker Compose v2.
- A native build toolchain and the Protocol Buffers compiler (
protoc), including its standard.protoinclude files, for the Rust dependencies.
Start the local product
From the repository root:
./dev.sh --no-envdThe launcher installs missing npm dependencies, starts infrastructure in Docker, applies database migrations, and builds and starts the application processes on your machine. The first startup can take a while because it compiles the Rust runtime. Leave this terminal running and wait for the readiness checks to finish.
The --no-envd flag leaves the local execution daemon disabled. The first
walkthrough uses only the model and Lightspeed’s persistent files. You can
connect compute when a task needs
processes or a shell. Running plain ./dev.sh also starts a local daemon;
sessions still need an environment configured before they can use it.
The launcher reads a root .env if one exists. A fresh installation can start
without deployment-wide model credentials because you will add a key through
the web app below.
Sign in and create a universe
Open your installation’s web app and sign in with the account configured during deployment or supplied by your operator.
If you used the development launcher, open http://localhost:5173/app/. The launcher prints the development account. Unless you have overridden it, use:
| Field | Development value |
|---|---|
admin@lightspeed.dev |
|
| Password | lightspeed-dev-password |
These credentials belong to the local development setup. A deployed installation uses an administrator account configured by its operator.
On a fresh installation, the app shows No universes yet. Choose New
universe, enter Getting started, and choose Create. The universe holds
the sessions, credentials, profiles, and workspaces you create during these
walkthroughs. If you already have a suitable universe, select it instead.
Configure a model
In your universe, open Settings → Integrations → Add integration. Choose OpenAI (API key) or Anthropic (API key), enter your key in API key, and choose Save key. Wait for a model list to appear under Available models, then choose Done.
Use an API-key integration for this walkthrough. The Codex and Claude Code subscription integrations serve those coding agents inside execution environments; they do not supply model inference for a Lightspeed session.
If model discovery reports an error, resolve it here before creating the session. A saved key needs access to the model you will select.
Start a conversation
- Open Sessions and choose the plus button labeled New session.
- Enter
First conversationas the Name and leave Profile at No profile (engine defaults). - Choose Customize setup…. Under Model configuration → Model, select a conversational model from the provider you just connected.
- Choose Create session.
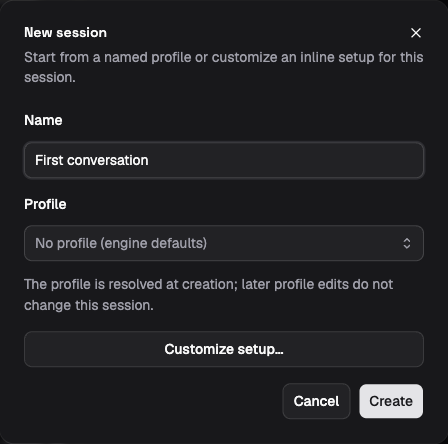
Demo mode: choose Customize setup… to select a model before creating the conversation.
Select the model explicitly. Adding a credential does not change the deployment’s default model, so leaving Deployment default selected can send the request to a different provider.
Send a short message:
Give me three questions to ask when reviewing an incident report.An assistant answer confirms that the web app, runtime, and provider connection work together. Refresh the page and open the same session: the conversation should still be there. The answer completed one run; another message will start a new run in this session.
Stop and return later
For a self-hosted release, follow Operations to manage the services. Your sessions remain available when you sign in again.
For the development launcher, inspect the local stack in another terminal at the repository root:
./dev.sh statusPress Ctrl+C in the launcher terminal, or run ./dev.sh stop, to stop the
application processes. The Docker infrastructure remains available. To stop
both the application processes and infrastructure:
./dev.sh downOrdinary shutdown keeps the data volumes. Run ./dev.sh --no-envd again when
you want to continue. The reset and volume-removal commands in the development
guide erase local state; they are for deliberately starting over.
If something fails
For a release installation, start with the self-hosting checks and deployment troubleshooting. The build and launcher checks below apply to the source path.
| Symptom | What to check |
|---|---|
| Docker or Compose cannot be reached | Start Docker and check docker compose version. |
The Rust build cannot find protoc or an imported standard protobuf file |
Install the compiler and its standard include files. If the build cannot locate the include directory, set PROTOC_INCLUDE to that directory. |
| A port is already in use | Check ./dev.sh status and the conflicting process. Service ports and overrides are listed in the development guide. |
| The launcher warns that no provider key is configured | Continue to Settings → Integrations and add the key there. The warning alone does not prevent startup. |
| The session reports missing credentials or model access | Check both the integration and the model selected for this session. They must refer to the same provider. |
| Sign-in fails with the displayed defaults | Check the credentials printed by the launcher; an existing .env or existing user account may use different values. |
Continue with Build your first agent to give the agent a reusable profile and a workspace it can edit. For local profiles, ports, and configuration options, see the development guide and environment-variable reference.